Thursday, December 31, 2015

FlowField V/S FlowFilter in Dynamics Nav

FlowField V/S FlowFilter in Dynamics Nav

People always ask this question "What is difference between FlowField and FlowFilter ? " in Dynamics Nav.
Lets find out here.

You can find both FlowField And FlowFilter in Fieldclass property of a table's field.

As shown below:

Filedclass Property,Dynamics Nav


FlowField is a type of Fieldclass property in Dynamics Nav table's field,which shows the output of the calculation mentioned in the CalcFormula Property. Eg the Inventory field in the Item table shows the total of the quantity of an item and is calculated as the sum of the Quantity field for all entries in the Item Ledger Entry table for an particular item.


As per MSDN You can use FlowFields to do the following:
  • Calculate the total of a field over a set of records and display the results.
  • Calculate averages.
  • Determine the existence of records in a table.
  • Determine the number of values in a table.
  • Determine the minimum value.
  • Determine the maximum value.
  • Look up a value in another column in another table.


FlowFilter is a also a type of Fieldclass property  in Dynamics Nav table's field, which is use to set ranges on the calculations that are calculated in FlowFields. Eg if the FlowField contains the total inventory of an item, then you can use a FlowFilter to see the total for a period of time slot like month, day etc. 


Note : Both FlowField And FlowFilter are virtual fields. Thats why at the time of data extraction from SQl Server, both will be not extracted.

Enjoyed the topic, Please do subscribe to our newsletter to get updated with every post without a miss.

Thanks for reading

Shubin Dongre

Wednesday, December 30, 2015

Why do the Microsoft Dynamics Nav 2013 Certification exam has been withdrawn?

Microsoft Dynamics Nav 2013 Certification exam withdrawn


Its a nature's course that to give place to any new thing in life, an old thing has to be compromised. Similarly in the changing scenario and day by day updating technology, Microsoft Dynamics is gaining ground with its new version of Microsoft Dynamics Nav 2015 and newly arrived version of Microsoft Dynamics Nav 2016. 

The main reason for the withdrawal of Navision 2013 certification is to introduce a new certification exam for Microsoft Dynamics Nav 2015 which is likely to be launched soon. Still there are no news confirmation for the same by Microsoft. For the time there are no Certification exams being conducted for the Microsoft Dynamics Nav Professionals.

Microsoft has been updating its technology time to time and side by side replacing certification for the old technologies with the new ones. Here are the list of exams which are retired by Microsoft for Dynamics Navision from the beginning of time: 

MB7-221     Navision 4.0 C/SIDE Introduction                                            January 12, 2010
MB7-222     NAV 4.0 C/SIDE Solution Development                                  January 12, 2010
MB7-223     Navision 4.0 Warehouse Managemen                                     January 12, 2010
MB7-224     Navision 4.0 Manufacturing                                                      January 12, 2010
MB7-225     Navision 4.0 Financials                                                            January 12, 2010
MB7-226     Navision 4.0 Installation and Configuration                              January 12, 2010
MB7-227     Navision 4.0 Trade and Inventory                                            January 12, 2010
MB7-231     Navision 4.0 Relationship Management                                  January 12, 2010
MB7-232     Navision 4.0 Service Management                                          January 12, 2010
MB7-233     Navision 4.0 Costing                                                                January 12, 2010
MB7-514      Microsoft Dynamics NAV 5.0 C/SIDE Introduction                  November 30, 2012
MB7-515      Microsoft Dynamics NAV 5.0 Financials                                  November 30, 2012
MB7-516      Microsoft Dynamics NAV 5.0 C/SIDE Solution Development  November 30, 2012
MB7-517      Microsoft Dynamics NAV 5.0 Installation and Configuration    November 30, 2012
MB7-700      Microsoft Dynamics NAV 2013 Installation and Configuration July 31, 2015
MB7-701      Microsoft Dynamics NAV 2013 Core Setup and Finance         July 31, 2015
MB7-702      Microsoft Dynamics NAV 2013 C/Side Development               July 31, 2015
MB7-838      NAV 2009 Installation & Configuration                                     June 30, 2014
MB7-839      NAV 2009 Core Setup and Finance                                         June 30, 2014
MB7-840      NAV 2009 C/SIDE Introduction                                                June 30, 2014
MB7-841      NAV 2009 C/SIDE Solution Development                                June 30, 2014
MB7-842      NAV 2009 Trade & Inventory                                                    June 30, 2014
MB7-843      NAV 2009 Warehouse Management                                        June 30, 2014
MB7-846      NAV 2009 Relationship Management                                       June 30, 2014
MB7-848      NAV 2009 Service Management                                               June 30, 2014
MB7-849      NAV 2009 Manufacturing                                                          June 30, 2014
MB7-849      NAV 2009-Produktion (Danish)                                                 June 30, 2014
MB7-849      NAV 2009-Produktion (German)                                               June 30, 2014


Follow us on Facebook and Twitter. We'll keep you posted when the certification for Nav 2015 arrives. Till then Happy Coding!

Tuesday, December 29, 2015

.Zup file In Dynamics NAV

Zup File

Ever wondered why we get pop up "Do you want to replace the .zup file" on closing of Dynamics NAV Development Environment and what does it mean,
Lets Clear out here.


.Zup File :  All setup parameters that are responsible for running Dynamics NAV Development Environment are stored in .Zup file , which has default name fin.zup .


Locations:


  • Windows XP :  C:\Documents and Settings\<Username>\Application Data.


  • Windows 7 and up :  C:\users\<User name>\AppData\Roaming\ .


.Zup File contains:

  • Database name.
  • Database server name.
  • All parameters defined in Options window.
  • User-specified personalization of development environment windows, such as window size, window position, column order, column visibility, and column width.


Why it's not a good practice to replace .Zup file :


When we are working on more than one Databases of Dynamics Nav  on a same PC  e.g. Database 'A' and Database 'B'.When i will open Database 'A' a .Zup file be created for the same which contain user setup information for Database 'A' . And when i will open Database 'B' ,at the time of closing it will pop up "Do you want to replace the .Zup file"  .


  • If Click 'Yes' : It will replace the .Zup file and makes a new one for Database 'B.

  • If Click 'No' : It will not change user setup information in .Zup file.

Issue resolution for .Zup File :

Any issue occurs regarding .Zup file in Dynamics Nav , best to delete the .Zup file because a fresh file will created again .

Enjoyed the topic, Please do subscribe to our newsletter to get updated with every post without a miss.


Thanks for reading,

Shubin Dongre


How to use Virtual Printer in Microsoft Dynamics NAV 2013 R2 with the help of LS Retail Virtual OPOS Devices.

Virtual Printer

Doing some implementation in Sales receipt and you want to print receipt again and again physically , this will waste your resources.
Instead of this try  to do it virtually with the help of Virtual printer functionality of LS Retail virtual OPOS Devices in Microsoft Dynamics Nav 2013 R2 , which comes with LS Retail Toolbox.

LS Retail virtual OPOS Device will show you a virtual receipt after every successful printing command , which will be like this :


Virtual receipt


Prerequisites :

  • Microsoft Dynamics NAV 2013 R2 Development Environment.
  • LS Retail Toolbox 6.06


Steps to Setup Virtual Printer :

1). Open "Microsoft Dynamics NAV 2013 R2 Development Environment"  .

2).Open "Object Designer"  and run Table "POS Hardware Profile"  ( ID :99008900).

3). Then select your "Profile ID"  and  go to Field named "Printer".

4). In "Printer" field select "Virtual"  from drill -down menu and Click "OK"  button to save the changes.

5). Restart the application to make the changes works.

Congratulations you have set up virtual printer successfully.

Other devices which can also be used  virtually are listed below :


  • Customer Display
  • MSR Card Reader
  • Cash Drawer
  • Scanner
  • Scale
  • Tone
  • Dallas Key

You have to perform same steps for other devices to set them work virtually.

Enjoyed the topic, Please do subscribe to our newsletter to get updated with every post without a miss.


Thanks for reading,

Shubin Dongre

Monday, December 28, 2015

Code coverage tool for Microsoft Dynamics Nav 2013 R2

Code Coverage Tool

We all are missing code coverage tool in Microsoft Dynamics Nav 2013 R2 that we have used in Microsoft Dynamics Nav 2009 R2 and older versions to make debugging simple, Code Coverage  is a tool which shows the executed code of functions.

Microsoft launched "Application Test Toolset for Microsoft Dynamics NAV 2013", in this set of tools you can find code coverage also.

If you want to download whole set of "Application Test Toolset for Microsoft Dynamics NAV 2013" you can follow this link.

To download only  Code Coverage  tool you can follow MIBUSO link.


Enjoyed the topic, Please do subscribe to our newsletter to get updated with every post without a miss.

I will share more posts regarding other tools for "Application Test Toolset for Microsoft Dynamics NAV 2013"  in future.


Till then happy coding!


Thanks for reading,

Shubin Dongre


How to save license in Microsoft Dynamics Nav 2013 R2

License File

Its a tedious task for developers to upload license file in  Microsoft Dynamics Nav 2013 R2 again and again.You can save license file in your Microsoft Dynamics Nav 2013 R2 database permanently by just clicking one option "Save license in Database".
You can find this option in "Microsoft Dynamics NAV 2013 R2 Development Environment"

Steps are follows:

1). Open"Microsoft Dynamics NAV 2013 R2 Development Environment".


2). Then Open your respective Database in which you want to save the license.


3). Go to  "File" >> "Database"  >>  "Alter".

As you can see in screenshot below:


Saving License file to Databse


4).A new window will appear  "Alter database" , In which you have to go to "Integration"   Tab

and put a tick on "Save license in Database"  option.

As you can see in screenshot below:


Alter database


Now you are free to work without uploading license again and again.

Enjoyed the topic, Please do subscribe to our newsletter to get updated with every post without a miss.


Thanks for reading

Shubin Dongre


Sunday, December 27, 2015

How to Define a Temporary table in Microsoft Dynamics Nav

Temporary Tables

Temporary Table : A temporary variable that’s carry a table is called temporary table. It is basically used as a buffer  in C/AL programs for table data. Temporary table can be used in a same way as a database table is used. Temporary table is only present in the memory till the table is open.

Advantage

All the exchange with a temporary table only occurs on client side. If you want to perform a large amount of calculations, a temporary table can used to load the data. This will increase processing speed because all the operations are processed on the client.

How to define a temporary table:

1). Click on Tools >> Object Designer>> create a new table.

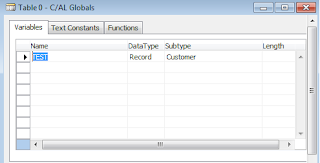
2). Then go to View >> C/AL Globals or C/AL Locals. If you  have selected   C/AL Globals, the C/AL Globals window appears.


Definig a temporary table variable

3). Write a name for the temporary table variable, and select Record as the data type ,Select the desired table in Subtype field.


4). Select your variable line and click View>> Properties, It display the Properties window.

Changing property


5). Make the value of the Temporary property to Yes.


After you have successfully created a temporary table, you can use it in your C/AL code.

Enjoyed the topic, Please do subscribe to our newsletter to get updated with every post without a miss.

Thanks for reading

Shubin Dongre


How to SEO - Optimize my Blog to increase the Page rank on Google Search?

Have you came across a situation when you started writing Blogs but receiving no traffic? It is the worst situation in a Blogger's life. The content of the blog matters alot but despite of writing excellent content and a wonderful blog, no one is there to read your blog as it not appearing on the first page of Search Engines like Google. In this situation, SEO is the only boat that can save you from drowning. Today, I am going to discuss to SEO Optimize your Blog to increase the Page ranking on Google Search. 


how-to-seo-optimize-my-blog-to-increase-page-rank-google


Read the 5 Stage Process of SEO first to have a better understanding of the topic. Read the Full Article in the following Link
5 Stage SEO Process to become an SEO Expert

Now coming to the topic, let us Remember few points that we have to keep in mind while posting a Blog:


  • Title Tag.
  • Meta Tags.
  • Header Tags (H1, H2, ....... , H6).
  • Image (filename, Alt text)
  • Internal link
  • URL
  • Robots.txt
  • XML Sitemap
Have you remembered the above points? Remember it by heart as you will need it during the entire journey of your blogging career.

Now we'll discuss the above mentioned points in detail to help you understand and implement better SEO on your blog. 


1) Title Tag

  • The Title should be Short, Unique, and should have a good sales pitch (should have around 65 characters or 15 words).
  • Should accurately describe the Page's content.
  • Avoid the Default or vague titles (like Untitled, Page1, etc).
  • Avoid keyword stuffing.
  • Create unique title tags for every page on your site.
  • Avoid using a single title across all of your Website's pages or a large group of pages.

2) Meta Description Tag

  • The Meta Description should be Short, Unique and have good sales Argument. Google allows around 160 characters)
  • Accurately define the page's content.
  • The Meta Description should be well connected to the title.
  • Use unique descriptions for each page.

3) Header Tags

  • Use only one H1 element on any page.
  • Use <h1> for top level heading.
  • Accurately describe the page's content.
  • Unlike the title, this element can include links, emphasis and other HTML phrase elements.

4) Image Optimization & Graphic Alt Text

  • Choose a logical file name that reinforces the keywords.
  • Label the file extension.
  • Make sure that the text nearby the image is relevant to the image.
       <img src= "http://www.navstorm.com/images/good_image.jpg" alt=""these are the keyords I'm                  targeting" width="70" height="90"/>

     Points to be avoided:
    • You can use hyphens in the name to isolate the keyword, but avoid to exceeding two hyphens.
    • Avoid using underscores as a word separator.

5) Anchor Text / Anchor Links

  • Anchor text is a good practice.
  • The text of Anchor Links should be Descriptive.
  •  Use Anchor text / Anchor links for the internal links too.

6) Dofollow / Nofollow Link

  • When creating a link on a webpage using HTML, the standard code for that link should be:
          <a href="http://www.navstorm.com"> Search Engine Optimization</a>

  • To tell the spiders to NOT crawl a link, you need to add the following code to the HTML code above: rel="nofollow".
          <a rel="nofollow" href="www.xyz.com"> Search Engine Optimization </a>

7) URL's

  • Use words rather that numbers.
  • Provide one version of a URL to reach a document redirect www or non-www (canonical) to concentrate all reputation 301 Redirections.

8) Robots.txt

  • You robot.txt file would be located in the main directory of your website as per below example:

         Please open the above link to see the robots.txt of NavStorm's website.
  • Use the structure as follows:
    • User Agent : *
    • Disallow :

9) Sitemap.xml

  • Your website sitemap should be located in main directory of your website as per below:

  • Your Website Sitemap should follow Google's XML Standards.

10) Semrush Tool

  • I have saved the best one for the last. Semrush is the best SEO and SEM tool available in the market. I am personally using this tool and trust me guys, this tool has boosted my site's traffic drastically. Enter your Website name in the Semrush tool below to check the your website SEO health.


By taking all the above mentioned measures, it will definitely improve your Page Rank on Google. I hope you liked the post and learned a lot about SEO. If so, please Like our Facebook Page and also Follow us on Twitter.

Happy Blogging!

Saturday, December 26, 2015

Solution to "You do not have permission to run the 'Object Name' Object Type. Contact your system administrator to have your permissions changed." | NavStorm

Solution to "You do not have permission to run the 'Object Name' Object Type.  Contact your system administrator to have your permissions changed." | NavStorm


If you are getting this error "You do not have permission to run the ''Object Name' Object Type.  

Contact your system administrator to have your permissions changed."  


Solution to "You do not have permission to run the 'Object Name' Object Type.  Contact your system administrator to have your permissions changed." | NavStorm


This is a pure permission error which is cause due to lack of permissions in your license file.You have to check that you have uploaded the developer license or not because only developer license has rights to design the objects. For steps to upload license follow this link "Steps to upload license file".


I was getting this error "You do not have permission to run the ''Object Name' Object Type.  Contact your system administrator to have your permissions changed."  because, I have uploaded navision 2013 license file on navision 2009 , that's a common problem developer's  face while working on different version's simultaneously.

Enjoyed the topic, Please do subscribe to our newsletter to get updated with every post without a miss.


Thanks for reading

Shubin Dongre

shubindongre@gmail.com

Friday, December 25, 2015

How to Enable Telnet Client in Windows (with Pictures)

Below are mentioned simple steps which will guide you to enable the Telnet in Windows 10, Windows 8.1, Windows 8, Windows 7:
  1. Open the Control Panel.
  2. Select the 'Programs and Features' option in the Control Panel.
  3. The screen will appear as shown in the below screenshot. Now select the option 'Turn Windows features on or off' from the Left Menu pane.
Turn Windows Features on or off Control Panel
4. The window will pop-up as displayed in the below screen. Search for the 'Telnet Client' option and tick mark the same and then Press OK.
Enable Telnet Client in Windows Features Control Panel
5. After pressing OK, the screen will appear as below which shows the processing while applying the changes for the Telnet client.
 Suggestions, comments and questions are most welcome!

5 Stage SEO Process to become an SEO Expert

To run a successful blog or to improve page ranking of your website among the Search Engines like Google, Bing, etc., it is mandate to keep in mind the 5 stage SEO process to become an SEO Expert. 


5 Stages SEO Process become SEO Expert


The phases are given as follows:


Preliminary Stage

  • Begin the analysis of the website to find the loopholes and the weak-points where the SEO is urgently needed.
  • Search each and every keyword which comes in mind which are relevant to the content.
  • Finalize the keywords.

 Stage 1 - Site Architecture

  • Now study the structure of the website and design the best suitable structure according to the content.
  • Rewrite the URL.
  • Optimize the alt text internal links present in the HTML code in the images.


Stage 2 - Content Development

  • Keep on optimizing the old content and making it more SEO friendly.
  • Write the content and include more and more keywords in the content which are finalized in the first step.

Stage 3 - Link Building

  • Do the Search Engine & Directory submission of your website. Many websites provides this feature.
  • Submission of the blogs/articles using the Search Engine & Directory submission technique.
  • Link exchange or online advertising.
  • Publicize your blogs/articles using Social Media.

Stage 4 - Analytics & Reporting

  • Keep a look on the ranking updates of the Search Engines.
  • Monitor the traffic.
  • Re-optimization of the pages as required after the analysis done using the reports.

The discussion points under the phases are very briefly explained. Kindly post your comments below if need more clarification in any of the points mentioned above.


Now that you have read the 5 Stages of SEO Process, its time to try your hands on the real time SEO you can apply to your blog to increase the page rank on Google.

The tool which I am personally using for SEO optimization of my website is Semrush. It is the best SEO and SEM tool available in the market. I am personally using this tool and trust me guys, this tool has boosted my site's traffic drastically. Enter your Website name in the Semrush tool below to check the your website SEO health.


Read the full article in the link : How to SEO - Optimize my Blog to increase the Page rank on Google Search?


Suggestions, comments and questions are most welcome!